

A newer tutorial, which is hopefully easier to understand than this section, is now available: here it is.
Finally we're ready to to make a model with texturing. It won't be a work of art but it will introduce the techniques you'll use when you make weapons and maybe even characters later on.
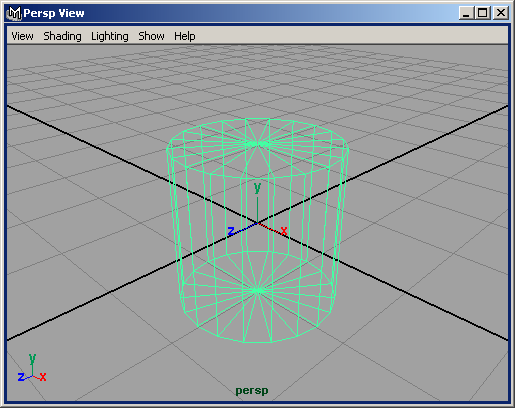
We'll be making this:

Kind of like a treasure chest but with funky coloured faces instead of a wooden texture. The reason for this is simply that putting unique images on to each face of the chest is better practice than using a generic texture which could be very easily applied without worrying about some of the problems which the unique images will throw up.
We'll use a polygonal cylinder for our chest. Everyone has his own preferred techniques when modelling and I'm a big fan of n-sided prisms. If I'm creating a foregrip for a rifle, I'll use maybe a pentagonal prism. A scope might be made from a hexagonal prism. In Maya, any prism which isn't a cuboid is a polyCylinder with a set number of axis subdivisions.
From the Create menu, open the Polygon Primitives submenu and click the box to the right of Polygon Cylinder. Clicking the box brings up an options box for the new cylinder rather than creating it directly with your current options. Remember you can hold down Control and Alt while selecting the menu item to add it to your current shelf.
When the options box appears, choose Reset Settings from the Edit menu then click Apply to make your cylinder.
Let's split the cylinder in two, creating the chest's lid. In the top view, right click the selected cylinder and choose Vertex from the selection menu. Select all the vertices to the left of the origin. Make sure you don't select any of the vertices which lie on the Z-axis.

From the Edit Polygons menu, choose Delete Vertex. Note that you can't just press delete because you must explicitly tell Maya you want to trash the edges connected to the doomed vertices. Don't forget you can use the hotbox to access the menus without searching for the menu bar at the top of Maya's main window...

Now we'll extrude the flat face we just created and make the body of the chest. Right click the model and choose Face from the selection menu. Select the flat face by clicking the little blob in its centre. The top view window is probably easiest for this.
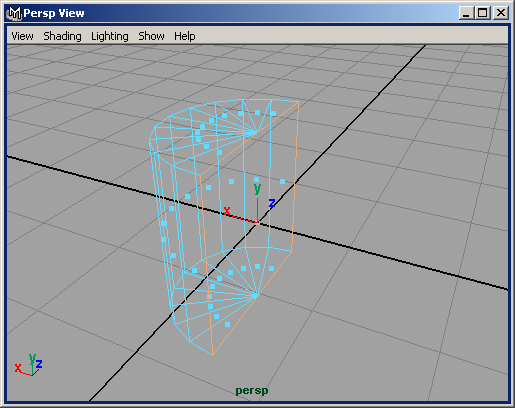
Choose Extrude Face from the Edit Polygons menu. If you've followed along with me exactly you'll see a set of manipulators appear like this:

The little circle to the right of the red manipulator (highlighted in yellow because I clicked it) is the co-ordinate system toggle. It's currently in local co-ordinates mode. Notice how the manipulators don't point the same way as the little axes icon at the bottom-left of the image. You can click the toggle to change to world co-ordinates and they will face along the world axes. Generally you want local co-ordinates!
In the local co-ordinate system, drag the blue manipulator away from the chest. In world co-ordinates you would push the red manipulator towards the chest. However you do it, make your mesh into the shape shown below:

Now our chest shape is complete but what's this? Two square faces (and so eight triangles) at either end? That's no good. From the Display menu, Heads Up Display submenu, choose Poly Count. The three columns that show up are - from left to right - number of xxx in the scene, number of xxx in the currently selected object, number of xxx in the current selection. We're going to reduce the face count by deleting the edges between those redundant faces.
Press Q or use the Select Tool icon to enter selection mode. Now Right click the mesh and choose to select by Edge. In the front view, drag a selection box to select the two edges along the end faces:
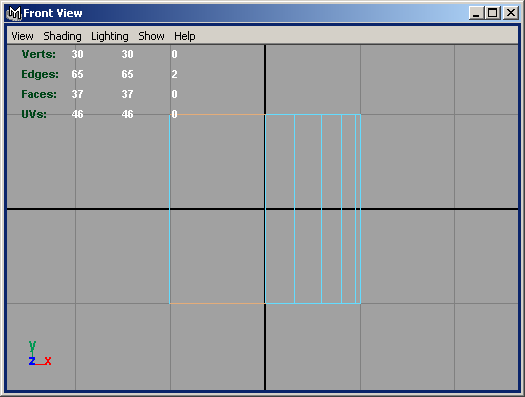
Choose Delete Edge from the Edit Polygons menu. Woohoo! We deleted two edges, two vertices and two faces. This may not sound like much but in low-poly modelling you take any chance you can get to bring the polygon count down without affecting the shape of your mesh.
Jump to the second part of the materials and UV section of this tutorial for more.
| intro | part 1: Setting the layout | part 2: Editing basics | part 3: Vertex manipulation | part 4: Face manipulation | part 5: Materials, texturing and UVs - (i) | part 6: Materials, texturing and UVs - (ii) | part 7: Materials, texturing and UVs - (iii) | part 8: Final notes |